Bittersweet Chocolate Cheesecake
Treat yourself to a cool piece of Bittersweet Chocolate Cheesecake. The chocolate crust holds a smooth decadent cream cheese and bittersweet chocolate filling. The rich flavor of this cheesecake will satisfy any chocolate lover.

This is the kind of dessert you want to bring to a party when you want to impress and make people happy.
The rich flavor, which is from the cream cheese and bittersweet baking chocolate, is complimented by the chocolate crust.
In my humble (and weird) opinion, this dessert is to be savored. Don’t rush it.
In other words, only eat it when you have the time to properly savor every cool, delicious bite.
Making Bittersweet Chocolate Cheesecake
Begin by wrapping the 9″ springform pan (bottom and sides) with foil.
The reason for this is in case the butter in the crust leaks out the bottom.
Just trying to keep the oven clean. You could also set it on a rimmed cookie sheet.
In addition, the inside of the springform pan needs to be greased. For the sides, however, I prefer to use strips of parchment paper.
This allows you to remove the side of the springform without having to run a knife around the inside of the pan, thereby roughing up the sides.
The parchment paper leaves the sides looking smooth and pretty.
The chocolate crust…
So, the crust is pretty basic: mix the 3 ingredients (chocolate wafer crumbs, sugar, and melted butter) and press them into the bottom and up 1 inch of the pan.
Bake this in a preheated oven set at 325° for 10 minutes.
Let the crust cool completely.

While the crust is cooling, melt the bittersweet baking chocolate, which needs time to cool down, too.
For the best melting method, follow instructions on the inside of your package of baking chocolate.
I use the microwave, but you might prefer another method that you’re more comfortable with.
I usually bake using Ghirardelli chocolate — here’s how they tell you to melt it.
In microwavable bowl, place chocolate in microwave on medium (50%) for 1 1/2 minutes. Stir.
If not melted, and mine was not, repeat heating step, stirring every 30 seconds, as scorching can occur.
When only small lumps remain, continue stirring to complete melting until completely smooth, then allow it to cool.
The cheesecake filling…
In a large bowl using an electric mixer, beat the cream cheese, sugar, and vanilla extract until fluffy.
One note, don’t put all the cream cheese in the bowl at once.
For example, add the first 8 oz. of cream cheese with the sugar and vanilla and let that smooth out.
As the beaters smooth out the cream cheese, begin adding the second 8 oz. brick of cream cheese.
This helps the cream cheese to not creep up the beaters, thus making a huge mess.
One more note about cream cheese; make sure it’s softened and full-fat.
The reduced fat varieties will leave your cheesecake softer and more watery. Icky!
Next, add in the flour, then one egg at a time until everything is blended.
Lastly, beat in the melted chocolate until thoroughly mixed, then pour over the crust.

Baking your Bittersweet Chocolate Cheesecake…
Your rack should be in the center of your oven.
Place your foil wrapped pan in the center of the rack and bake for 1 hour to 1 hour 15 minutes.
It’s done when the sides are set and the center still jiggles slightly when moved.
Turn the oven off and open the door about 4 inches. Leave the Cheesecake in the oven for 30 minutes.
Then let the cheesecake further cool on a wire rack for another 30 minutes.
If you didn’t use the parchment paper on the sides, now would be a good time to run a knife or small spatula around the sides to loosen the cheesecake.
Refrigerate for at least 6 hours, or preferably, over night, which makes this a great make-ahead dessert.

Decorating and serving the cheesecake…
Fifteen minutes before serving, take the cheesecake out of the refrigerator.
Check to see if the sides have loosened from the pan, then remove the side of the springform pan.
Rerun the spatula around the inside if not thoroughly loosened.
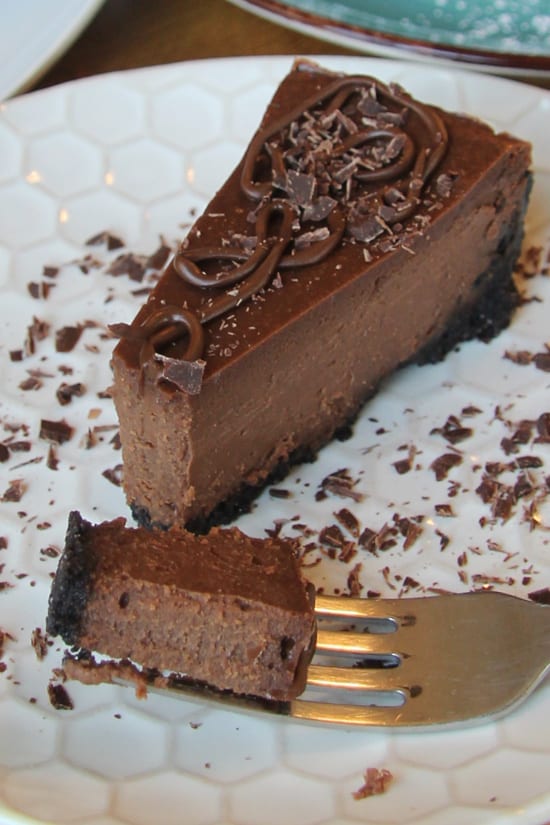
Ok, now it’s time to decorate, if you’re so inclined.
You don’t need to, it’s elegant the way it is, but decorating is fun…and pretty.
So, let’s decorate.
Just a few ideas for decorating that won’t take much time, such as powdered sugar with fresh raspberries.
A chocolate ganache is great on absolutely anything and everything, especially if you’re a chocolate lover.
Piped on melted chocolate, like I used on my Chocolate Cheesecake Bites is not only easy, but you can make any pattern you want.
For example, pipe on crazy curls, or go in straight lines that cross each other.
Make chocolate shavings or shards and sprinkle on top.
One more idea, homemade Raspberry Whipped Cream would look lovely, especially with a few additional whole berries.
There’s probably a million other decorating ideas you’ll come up with, so if you use one, follow me on Pinterest and post a picture of it so we can all see.
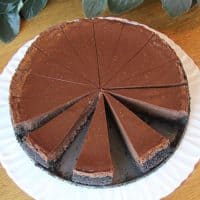
Cutting Bittersweet Chocolate Cheesecake…
You can watch videos of people cutting cheesecake on YouTube.com, which is where I learned, but I’ll break it down for you here.
Have a thin knife sitting in hot water, something like a tall glass, or I used my blender. LOL
A wide knife creates too much drag, which is why I said use a thin knife (shown in 3rd picture).
Ok, find the center of the cake and make your first cut. No sawing motion, just push the knife in and pull it out the side.
Dip the knife back into the hot water and wipe clean.
Do not skip this step, the knife must be wiped clean after every cut or crumbs will accumulate on the top.
For 16 perfectly even pieces cut the top-to-bottom, then left-to-right cuts. You now have 4 pieces and it looks like a plus sign (+).
Now rotate the cake sightly and center another (+) centered between the other cuts. You now have 8 pieces.
Repeat this 2 more times, always centering the next (+) and you’ll end up with 16 total. You got this!
Bittersweet Chocolate Cheesecake
Ingredients
Crust:
- 9 oz. pkg. chocolate wafers, (or 40 wafers) crushed (about 3 cups)
- 1/2 cup butter, melted
- 1/3 cup granulated sugar
Filling:
- 8 oz. bittersweet baking chocolate, melted and cooled
- 16 oz. cream cheese (2 pkgs.), softened
- 2/3 cup granulated sugar
- 1 1/2 tsp. vanilla extract
- 1 Tbsp. all-purpose flour
- 3 large eggs
Instructions
- Preheat oven to 325°. Grease bottom and sides of 9-inch springform pan. Wrap outside of pan with foil to prevent leaking, or place cookie sheet below pan while in oven. (Water bath not needed.)
Crust:
- Mix wafer crumbs, sugar, and butter thoroughly. Spread in bottom and 1-inch up side of pan. Bake 10 minutes. Cool completely on wire rack.
Filling:
- In microwavable bowl, melt baking chocolate. Microwave for 1 1/2 minutes on medium (50%), stir. Continue to microwave and stir in 30-second intervals until smooth. Cool.
- In large bowl, beat cream cheese, sugar, and vanilla extract until fluffy. Add flour. Beat in eggs, one at a time just until blended. Beat in melted/cooled chocolate. Pour into cooled crust.
- Bake for 1 hour to 1 hour 15 minutes, or until edges are set (center still jiggles slightly when moved). Turn oven off and open door at least 4 inches. Allow to remain in oven 30 minutes.
- Cool on wire rack for 30 minutes. Refrigerate for at least 6 hours, or overnight. Run small knife or spatula around edge of springform pan, remove foil, and side of pan.
- Set cheesecake out on counter 15 minutes before cutting. Enjoy!
- OPTIONAL: garnish with chocolate shavings, melted chocolate, powdered sugar, and/or fresh raspberries.
Notes
Nutrition
More Dessert Recipes…
If you love dessert, and who doesn’t?…here are a few of my top-rated desserts according to my readers:
- No Bake Lemon Blueberry Dessert
- Caramel Apple Spice Cupcakes
- Sugar Cookie Lemonade Crumble
- Brown Butter Pecan Cupcakes
- German Apple Cheesecake
- Chocolate Banana Pudding Cake
For more dessert recipes including cookies, pies, cupcakes, bread, and cakes, go to the dessert section of SweetOrdeal.com.
Don’t forget to pin a picture to your board so you’ll be able to easily find the recipe again.
Thanks so much for stopping by, and have a blessed day.

 Copyright © Sweet Ordeal. All content and images are copyright protected. Do not use any images without prior permission. If you want to republish this recipe, make sure to re-write the recipe in your own words and only list ingredients making sure to link back to this post for the original recipe and directions.


